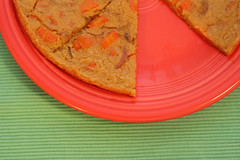
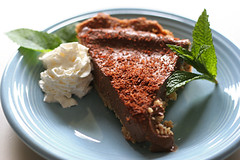
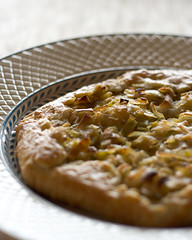
Saturday, December 09, 2006

Leek Tart


Leek Tart
Originally uploaded by monkeycat!.
Last weekend, Wynne had a few people over at her house for a Pinot tasting/dinner. I brought some homemade quesadillas made with corn tortillas from the Davis Farmer's Market. Stephanie, another grad student in our department, brought a heavenly leek tart. A few days later, she brought me her recipe, so I decided to give it a go.

Leek Tart
adapted from a recipe in an unknown recipe book

Filling
2.5 lbs leeks
3 tbs butter
1.5+ tsp water
8 springs of thyme, leaves removed from stem
salt
pepper
flour

Trim off tops (green part) and bottoms (root end) of leeks. Cut the leeks in half lengthwise, then cut them crosswise to make 1/4" half moons. Put into a colander and wash away the grit and sand.

Heat a skillet over med-high heat. Add butter and water (I know, I have never seen this technique either). When butter has melted, add leeks and thyme. Season with salt and pepper. Cook over medium-high heat until leeks are tender, 8-10 minutes. Add a little more water if the leeks start to stick to the bottom of the pan.

Set aside while you make the dough.

Galette Dough
2 c flour
1/2 tsp salt
1/4 tsp sugar
6 oz (1.5 sticks) unsalted butter
1/3 c ice water

Combine flour, sugar and salt. Using half of the butter (according to the recipe "should be cool - not cold and hard, but not too soft, either"), cut (mash with back of fork) into the flour mixture until the consistency of cornmeal is reached. Add the other half of the butter in bigger chunks. Work into the dough very briefly, just so it is in the dough, but not homogeneously mixed through. The little butter batches will help make a flaky dough. Lightly fork in ice water until evenly moistened. Divide dough into 2 balls, flatten into a disk, wrap in plastic wrap, and put in the refrigerator for an hour.

Assembly
About 10 minutes before the dough is done chilling, preheat the oven to 400ºF with a rack in the lowest position.

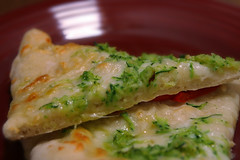
Roll out one of the disks on a lightly floured surface to make a 12" circle (approx 1/8" thick, if you can tell). Carefully transfer dough circle onto a baking sheet. Lightly flour the dough. I think this is to help absorb some of the liquid from the leeks so it doesn't get soggy. Evenly add the leek mixture to the dough. Only add the leeks in the middle 10" (leave a 1" border). Fold over the border of the dough to make a pseudo-crust. Beat an egg and brush the outside of the dough with the eggwash. This will help in brown in the oven. Put this in the oven for 25-30 minutes.

If the top gets too brown before the bottom does, just place a piece of foil on the top (no need to wrap, just place) and let it finish baking until the bottom browns.

The recipe did not say anything about waiting to cool, so I didn't :)

Enjoy!

Friday, December 08, 2006

Finished!


Finished!
Originally uploaded by monkeycat!.
Today was the last day of my first quarter of grad school at UC Davis. It has been an intense experience. I have learned so much and have met so many people. In this picture I am wearing a fashionable pinotblogger t-shirt. They are a new winery starting in the RRV and I am excited to see what they do.
Next week: Finals and some time took catch up on cooking.

Thursday, December 07, 2006

Curried Carrot Socca


Curried Carrot Socca
Originally uploaded by monkeycat!.
First off, time for an explanation. Grad school is a lot of work. So much so, in fact, that I have not had time to cook, never mind take pictures of my food, never mind write about it. I have decided, however, that the busiest time of the quarter (finals) is a great time to start again. So here it is...

A socca is a chickpea flour-based food originating from Provence. I first had one at Gregoire's second restaurant, Socca Oven (unfortunately now closed), in Berkeley, CA. Molly, Antonia and I each had a socca, and from that first taste, I decided that I would try to develop my socca-making skills. I started off making crepe-like pancakes in a crepe pan. They were very good, but not the same as Gregoire made them. Here is my first success with the thicker, heavenly socca.

Curried Carrot Socca
1 c. chickpea flour
1 c. warm water
2 tbs. olive oil, plus extra for the pan
1/2 tsp. salt
1/2 tsp. pepper

1/4 red onion, sliced very thin
1 clove garlic, chopped fine
1 large or 3 small carrots, diced. (I got mine from the Davis Farmer's Market and they were the best carrots I have ever tasted. The texture was not fibrous like supermarket carrots... but I digress...)
pinch of cayenne pepper
1/4 tsp curry powder
salt
pepper

Heat oven to 450ºF and put a cast iron skillet in to heat up.
Add chickpea flour, salt and pepper to a mixing bowl. Whisk in the water. Whisk in the oil. Let sit out for 20 minutes to hydrate.
In the mean time, heat a little bit of olive oil in a med-high skillet. Cook garlic for a few seconds, then add the onions and the carrots. Sweat for a minute while constantly stirring to avoid burning garlic, then turn down heat to medium. Add the curry powder and cayenne pepper. Continue to sweat for another minute, then turn of heat, stir for a minute, then remove from the heat.

Once the batter has sat for 20-30 minutes, add the onion mixture and stir. Pull the cast iron pan out of the oven. Add a little bit of oil (2 tsp) to coat the bottom of the skillet entirely. Pour in the batter and replace the skillet in the oven. Bake at 450ºF for 10 minutes. When the socca has set, move the skillet to the top of the oven and set the oven to broil for 2 minutes, until it starts to get a little bit brown.

The socca should come out of the pan pretty easily. I had to invert it onto a plate, then invert it back onto a second plate, but it stayed intact.

Good luck on your socca adventures and let me know how it goes for you, or if you have had the chance to have a socca previously.

Sunday, August 27, 2006

How to: Make Pesto

Summer is a wonderful time being that it provides the opportunity to partake in many activities not available during other parts of the year. One of the things that happens in summer is that basil grows very rapidly. I awoke this morning to find this picture from Hypnotic Aubergine.

Upon seeing that image I calculated that the best use of my late morning would be in the creation of some pesto. At the same time, I thought, "I should document the creation of the pesto and share it." I have done just that... and I discovered that making pesto, from picking the basil to putting the food processor in the dish washer, takes under 20 minutes. What a treat!

Pesto
The first step in making pesto is getting yourself some basil. For me this is quite easy; all I have to do is go outside and pick it (Steps 1a, 1b, and 2).
Step 1a: Find the basil
Step 1a: Find the Basil
Step 1b: Appreciate the beauty of basil
Step 2: Pick a heaping handful of basil
Step 2: Pick the basil

After acquiring some basil, I suggest that you give it a little rinse. Here in Davis, we recently had arial spraying of pesticides to try to wipe out mosquitos carrying West Nile Virus.
Step 3: Wash the basil

Another important ingredient in my version of pesto is garlic. I like using 2 cloves of garlic in my pesto, regardless of how much I make. I'm a sucker for garlic.
Step 4: Find 2 garlic cloves
Step 4: Find the garlic cloves

The garlic does not have to be chopped too finely; it is going to go for a spin the food processor in a second.
Step 5: Chop garlic
Step 5: Roughly chop the garlic

Next, I gave the garlic a few pulses in the food processor to finely chop it. After it was minced up, the basil went in and it too was finely chopped up with the pulse button.
Step 6a: Put garlic in food processor
Step 6b: Pulse garlic until it is finely minced
Step 7a: Put basil in food processor
Step 7b: Pulse basil until it is finely chopped

Pesto is held together by olive oil. In order to keep the pesto tasting alive and fruity, use good extra virgin olive oil. I chose Yolo Vineyards Olive Oil Company Extra Virgin Olive Oil because it is both good and local.
Step 8: Find some good extra virgin olive oil

The next part is the trickiest part for me. This is where the consistency of the pesto is decided. Some people like it thicker, some thinner. To get consistent results, I drizzle in the olive oil until the pesto starts moving around in a clump. At the beggining of the drizzle, nothing will really happen. Eventually, when the level of the olive oil gets up to the blade, it will start sloshing around and the pesto will incorporate.
Step 9: Add olive oil

The rest of the pesto making is adding in the Parmigiano-Reggiano cheese and the pine nuts. I prefer raw pine nuts in my pesto, while some use toasted pine nuts.
Step 10: Acquire some Parmigiano Reggiano

Into the food processor now went some grated P-R cheese, a handful of pine nuts, salt and pepper.
Step 11: Add the rest of the stuff

Incorporate the new additions, and you are done!
Step 12: Pulse until pine nuts are well incorporated
Step 12: Pulse until the pine nuts are well incorporated

All done!
Step Done!: Don't let your dog eat your pesto.
Step Done!: Don't let your dog eat your pesto

Tilden was more than interested in what I had been doing. It seemed like making pesto was really fast, and after looking at the EXIF data on the photos, I confirmed that hunch: It took 19 minutes start to finish to make the pesto.

Pesto
Bon Apetit!


Slideshow of pesto making

Monday, August 21, 2006

Pizza Dough Recipe

For Sparsh and Nadoshi:

Here is the recipe that we use. It is adapted from a magazine article whose title I forgot to write down. As soon as I get home, I will update this post.

Pizza Dough

2.75-3.25 c AP flour
1 pkg active dry yeast
1/2 tsp salt
1 c warm water
2-3 tbs olive oil

In a large bowl combine 1.25 c flour, yeast and salt. Add warm water and oil. Beat with an electric mixer on low for 30 seconds, scraping down constantly. Beat on high 3 minutes. Using a wooden spoon, stir in as much of the remaining flour as you can.

Turn out dough onto floured board. Kneed in enough remaining flour to make a moderately stiff dough that is smooth and elastic, 6-8 minutes. Divide into 8,4,2 pieces depending on size of pizza desired. (I usually make 2 14-16" diameter pizzas out of this. The crust is pretty thin, which I enjoy.) Let rest for 10 minutes minimum. I leave for it for 30min - 1 hour, which gives the dough a little bit more time to rise and a slightly spongier crust.

Sunday, August 13, 2006

Dinner idea rates going up

Due to recent press, my rate for dinner ideas will be going up to $5/15 minutes. So you lucky person who got to get an idea at my low introductory rate - Congrats. For the rest of you, I've got a head full of decent ideas about what you can do for dinner.

Two tomatoes or Living in the tomato capital and err... not living up to expecations.


Our Zebra Tomato
Originally uploaded by monkeycat!.
It was time for the big reveal, the moment that we have waited for all summer, the point in time when we realize that living in the Central Valley of California has an upside. It was time to eat the first tomatoes of the season. We live in Davis, California which is in Yolo County. Yolo County is the tomato capital of America. I'm not kidding. 90% of the U.S. tomatoes are grown in our fair county. The soil and the temperature are perfect to grow tomatoes, and for this reason, EVERYONE grows tomatoes. We like every other household in Davis planted tomatoes as soon as it stopped raining.

Now, months later, we realized that while Yolo County may be heaven for tomatoes, our backyard is not. We planted 3 tomato vines and were managed to get 6 flowers to set fruit. While most of Davis can get 6 fruits in a bunch, we made 6 total. Today I picked the 2 zebra tomatoes that we grew. Now, all is not lost; I tasted one and it was amazing - deep flavor, a slight hint of sweetness with no supermarket tomato qualities. It was a beautiful feeling cutting into the first tomato of the season. Yet there was something in the back of my head nagging at me... Two. Two? Two! I can't believe we were only able to grow 2 zebra tomatoes this season.

Oh well, next year will be better (I hope) and in the mean time, I think we are going to pull out the tomato plants and let the eggplant thrive with some additional light and let the lemon cucumbers colonize the rest of the bed. We have no problem growing those... In fact we can't give them away fast enough. If you are in town and want some zucchini or lemon cucumbers, give us a call. We would be more than happy to fill you up.

Thursday, July 13, 2006

Eat Local!


Zucchini and Garlic Pizzetta
Originally uploaded by monkeycat!.
After finishing Michael Pollan's Book The Omnivore's Dilemma and realizing that I live in an agricultural county, I decided that I can do a lot of good for the world by trying to eat foods that were grown close to my home.

As an aside (I promise it is relevant), when Antonia and I were in Rome a year ago, I had a life changing event. Pizza. Yes, Pizza with a capital P. Pizza in Rome compared to pizza is like the Church compared to a church. The best pizza that I had was near the Spanga metro stop - it was mozzarella and zucchini (now you can see where I'm going).

So I embarked on a culinary mission to recreate this pizza. I was able to do that a while ago, but because I fell so deeply in love with this pizza, I have been working for months on improving my recipe.

Finally! I can put together two of my missions - Eating Local (see the associated flickr group that I just started) and zucchini pizza.

Ingredient list
Pizza dough - homemade with Yolo County honey
Garlic - Yolo County
Olive Oil - Yolo County
Zucchini - our garden
Rosemary - our garden
Mozzarella - USA
Parmigiano-Reggiano - Italy

As you may be able to see, Italy is certainly not local. We all have our lines, and they are arbitrary, and they move. For me, its eating as local as possible, not necessarily boycotting supermarkets.

So, without further ado...
Zucchini and Garlic Pizzetta

1 ball of pizza dough, stretched out to a 10" circle
1/2 zucchini, grated and squeezed to remove excess water.
1-2 cloves of garlic, finely chopped
1 spring of baby rosemary (1/2 full grown) finely chopped
1/2 c mozzarella cheese, grated
1/3 c Parmigiano-Reggiano cheese, grated

Onto 10" circle of dough, drizzle olive oil, then spread around with your fingers to make an even layer of oil. Add garlic in an even layer.
Add mozzarella cheese. Instead of grating it first and adding it to the pizza, I just grate it straight onto the pizza. I find that I can get a more even application of cheese. Do the same with the Parmigiano-Reggiano. Mix together the zucchini and rosemary, and spread out onto top of cheese.

Put into a 425ºF oven for 15 minutes. To get the bottom a little bit browned, I do it on a cooling rack, but straight on a baking sheet will work, too.

Eating Local is a life choice for me, but I hope I will have some of you out there join me in my quest to save the world, one local vegetable at at time.

Wednesday, July 12, 2006

"Forget the omnivore’s dilemma; this was more like the carnivore’s discombobulation."

Steaks With Lots of Asides

You were the superstar judge on Top Chef... now what?
I'll take the Grade 8, 42-day aged, Ridgefield Farm Corn-Fed Premium Hereford Beef New York Strip Steak. Thank you very much.

Sunday, May 28, 2006

Roasted Corn Soup with Seared Sea Scallops

Is 2 times in one day too many times to eat corn soup? Possibly. If the second time the corn soup is home made and includes sea scallops, would you change your answer?

Roasted Corn Soup with Seared Sea Scallops

Soup
4 ears fresh white corn, sliced off cob
1/2 fresno (hot) chile pepper, chopped
1/2 white onion, chopped
3 cloves garlic, chopped
1-2 tbs chopped cilantro
juice of 2 limes
5 tbs vegetable oil
1 tbs margarine
1 c vegetable stock
salt/pepper

Scallops
6 sea scallops, cut in half to make to circles
salt/pepper
2 tbs vegetable oil

~Soup~

Heat up oil over high heat in a large skillet. Add in all of the vegetables. Smooth out into a single layer (or as close to as possible) and leave for 3-4 minutes. Add salt and pepper. Do not give in to the tempatation to stir. After that time, mix up the vegetables and smooth out again. Repeat this process until the corn is nice and brown. During the last repetition, add in the cilantro and lime juice. Note: Do not salt and pepper every time :) just the first.

Move roasted vegetables into a food processor. Turn on and let puree . Add the vegetable stock to thin out, although the soup will still be thick. Add in the margarine to finish the soup.

~Scallops~

Heat up the vegetable oil in the same large skillet, after cleaning it out (or a different skillet, I suppose). Salt and pepper the scallops and add to the oil. Cook them 2 minutes on the first side. After this time, they will release from the pan and be nicely browned. Give them 1-2 minutes on the second side, until done and brown.

~Assembly~

Add the soup to a bowl and place 2-4 scallops on top. Garnish with fresh chopped cilantro.

The feedback from my test subject (read:Antonia) is that this soup is much better than prepared corn soup. Who would have guessed?

Tuesday, May 16, 2006

A: BROIL!


Steak Taco
Originally uploaded by monkeycat!.
Now, I bet you are wondering what kind of question has the answer "BROIL!" Well, here it is:
What do you do when your dishwasher and air conditioner break at the same time?
Now, intuitively, neither of these would seem like a particularly good idea. I mean, besides food, the two main products of cooking are dishes and heat. And let me tell you, we have heat inside our house.
Hot

So why did I answer the question with broil instead of, say "pool" or "sleep"? Ingredients, that's why.

I had in my possession, all at one time
1) Fresh tortillas from a lady in Woodland, made this morning.
2) Tomatoes
3) Cotija cheese
4) Lime
5) Onions
6) Zucchini
and 7) Steak.
The only sane thing to do would be to put them together. So I did.

1 lb steak (I used top sirloin)
1/4 white onion, chopped
1/6 zucchini, chopped
1/4 tomato, chopped
2 tortillas, warmed over a gas burner or in the oven
fresh lime juice
salt
pepper
chili powder
cayenne powder
garlic powder
paprika

I made a rub out of the salt, pepper, chili powder, garlic powder, cayenne pepper and paprika and rubbed it on both sides of the steak.

The oven was set to broil at 500ºF.

With the oven rack set it its topmost position, put in seasoned steak (on a baking sheet). Broil for 5-6 minutes on the first side and 4-5 minutes on the second side, depending on how you like your meat.

After that finishes, take it out and LET IT SIT for 10 minutes. We will be using those 10 minutes to prepare the rest of the food anyway, but don't be tempted to cut before 10 minutes. You will be sorry. As you cut into the meat, you will watch all of the precious juices flow right onto the board. That is flavor. Pure flavor.

But I digress.

To make the onions and zucchini, heat up some olive oil (regular, not extra virgin, if possible) over med-high heat. Add in the onions and sautee for 3 minutes, and then add in the zucchini. While they are going, season with salt and chili powder. These seasonings will end up making a flavored oil to pour over the tacos.

Once you have made the onion-zucchini mixture, take it off the heat and cut up your steak into little pieces. Put the steak pieces into the tortilla, scoop on some onion mixture, add some tomato on top, sprinkle with a little cotija and pour over some of that precious, flavorful oil. I finished it with a little bit of parsley (I know David - again, I didn't have cilantro when I needed it!) and some lime juice.

Eat!

Sunday, May 07, 2006

Ode to Chickenless Nuggets and Other Fake Foods


Ode to Chickenless Nuggets
Originally uploaded by monkeycat!.
You may be able to tell by reading the posts on the blog that I enjoy food. I enjoy learning about ingredients, talking to producers, cooking and of course, eating. If I had to pick one phrase that describes what I think of as the best food, it would be "fresh and grown close to home."

This is all well and good most of the time, but there are occasions that I am strongly attracted to foods so antithetical to the above descriptor that some could call it blashphemy.

I enjoy fake food. Chickenless nuggets, Idaho Spuds, Del Taco $0.39 tacos. Each is fake and each holds a special place in my heart.

Idaho Spuds
I grew up eating fake mashed potatoes. In fact, to this day, my favorite comfort food is Louis Rich turkey hot dogs and Idaho Spuds fake mashed potatoes. It is what my mom would make for my brother and me when we got to request a meal. It was our favorite.

Del Taco Tacos
Anyone who has had a real taco knows that Del Taco does not serve real tacos. There is a place in Woodland, near Davis, called Tacos al Jalisciense. They serve real tacos. Asada, pollo, pastor, lengua, cabeza... I've still yet to try a couple of those. But when I go to Del Taco with my brother, its like we are transported back to our youth. No responsibility, to cares. Just fake tacos between brothers.

Chickenless Nuggets
I was only introduced to these later in my life - at 21. Antonia ate these and introduced me to them. They are one of our special meals.

You can see here that I gave a fake food a plating that it deserves. I feel bad for these fake foods sometimes. People who love foods tend to shun fake foods, yet they mean so much to us as a people. Some would say they are the glue that holds society together.

Some would call it folklore. :)

Saturday, April 29, 2006

Davis Farmer's Market


Selling Thier Wares
Originally uploaded by monkeycat!.
The return of the sun signals the return of the Farmer's Market. Well, more accurately, the return of the sun signals the return of Greg to the Farmer's Market. Here some of the farmers selling their produce. The man in the blue sweatshirt with the woman bending over is selling honey and almonds. A few months ago Antonia and I took a picnic out in the country and then found out that we had our picnic in this man's almond orchard.

This is only one of many farmer's markets that take place every day all over the world. The Cooking Diva is putting together a gallery of farmer's markets all over the world. I think photos from the markets in South and Central America are beautiful.

When I'm at the farmer's market, I try to find out as much as possible about the produce that the farmers are selling. There will never be a better time, I think, to find out about how the food is made. These people are 0 steps away from the land. They know what was done to the fruits and vegetables (and animals) every day, from when they were planted (or born) until we see them at the market. They are a fantastic source of information, and I exploit them. There, I said it. I exploit the farmers at the farmer's market for their expansive knowledge of their foods.

Thursday, April 20, 2006

The End of Passover


Passover Cookies
Originally uploaded by monkeycat!.
Well, tonight Passover officially ends. For those of you who have been reading some of the Passover posts or looking at the pictures, you may notice that some recipes, such as these cookies, could not have been made without chametz (grain). That is true. These cookies have oatmeal. This all stems from my admittedly modified observance of Passover. To me, the whole ordeal of Passover is to remember what happened during the Exodus and to re-enact a little bit of the hardship that our ancestors faced. To go as far as not using corn or oats or corn syrup(!) is forgetting the meaning of what happened, in my mind. If the Jews leaving Egypt didn't have time to bake their bread, they also didn't have time to make matzo ball soup, egg salad, or macaroons. It doesn't stop us from making all of these foods. We don't consume flour in observance of what happened. For me, its no flour, no yeast. So if you find recipes that don't apprear kosher for Passover, now you know why. :)

That said, I hope everyone had a great Pesach and enjoy thier rice/pasta/corn/bread/cake/pastry tonight!

-Greg

Friday, April 14, 2006

Passover Chocolate Pie


Passover Chocolate Pie
Originally uploaded by monkeycat!.
Antonia proves again to be the most wonderful human alive. She has taken it upon herself to come up with tasty Passover dessert, which is not easy (ask anyone who has had Passover cookies).

She did manage to make a pie so good, that I would eat it during the rest of the year, never mind just this week.

Antonia's Passover Chocolate Pie

Crust
1 stick margarine
1 c matzo meal
1 c almond meal
1 tsp grated ginger
1/4 tsp fresh ground nutmeg
1 tsp cinnamon
1/4 c sugar
slash of ice water

Pulse all of the ingredients besides the water in a food processor until blended. Splash in some water until the desired consistency is achieved. The amount of water varies depending on the moisture in the air. I don't know what she looks for, but it works. You will have to ask her :)

Grease a pie plate with some Pam. Press the crust into the pan. Dock the dough with a fork gently (Poke holes in it).

Put the crust into the oven for 15 minutes @ 375ºF. Pull out the crust, spray one side of a piece of aluminum foil and put the foil into the crust, spray side down. Put some beans or rice on top of the foil and put it back in for 10 more minutes.

Pull out and let cool.

Filling

2 c chocolate chips, melted
1/2 c sweet white wine or liquer
1 pkg silken tofu
1 tbs vanilla
1/2 tsp salt
2 tbs honey
2 tbs cocoa powder

Blend all of the ingredients together in a food processor. Pour filling into cooled (or mostly cooled) pie crust. Garnish with grated chocolate and put in the refrigerator to set. Let set overnight.

We made this last night and tried it today after lunch. We were both blown away by the extent of its tastiness. It does not taste one bit like a Passover food... Which raises the question - If you aren't sacrificing for Passover, is it really a Passover food?

Thursday, April 13, 2006

PASSOVER SPECIAL! - Cauliflower Soup with Crisp Garlic and Olive Oil

Today was the first day that I had to deal with Passover cooking. Passover is a very powerful holiday, but cooking without flour is much harder than it seems. I saw this recipe on Slashfood this morning, and figured it would be perfect for Passover. I tweaked it a little (basically changing the garnish; switching out the scallion and adding olive oil).

Cauliflower Soup with Crisp Garlic and Olive Oil

1/2 head cauliflower florets
5 cloves garlic, whole
1 clove garlic, sliced thin
1 tbs olive oil
salt

Steam the cauliflower and the 5 cloves of garlic until the cauliflower is very soft.

Add the cauliflower and garlic to a blender, and add about 1/2 cup of the steaming liquid. Blend until smooth. Add salt to taste.

In a small sautee pan, heat up some olive oil. When hot, add in the sliced garlic, and fry on one side until it browns.

Pour the cauliflower soup into a bowl and garnish with the browned, crisp garlic and some olive oil.

This was a very easy and quick food, perfect for Passover.

Monday, March 27, 2006

Broiled Salmon in Soy-Honey and Wasabi Sauces

After a food-filled trip to Southern California, it was time to lighten up the fare at our house. I had sushi for lunch today, which inspired me to prepare fish for dinner. While at work, I did some searching and came across this recipe at epicurious.com [recipe]. I added some shitake mushrooms, and we had an awesome, tasty dinner that was light and pretty healthy.
Here is the recipe from the link above:

For salmon
1/2 cup mirin (Japanese sweet rice wine)
2 tablespoons soy sauce
1/4 cup rice vinegar (not seasoned)
1 tablespoon finely grated peeled fresh ginger
4 (6-oz) pieces salmon fillet

For sauces
2 tablespoons soy sauce
1/4 cup honey
1 tablespoon fresh lime juice
2 teaspoons wasabi powder
1 tablespoon water

Accompaniment: lime wedges

Marinate salmon:, Stir together mirin, soy sauce, vinegar, and ginger in a shallow dish. Add fish, skin sides up, and marinate, covered, at room temperature 10 minutes.

Preheat broiler.

Make sauces: Boil soy sauce, honey, and lime juice in a small saucepan, stirring frequently, until thickened, about 4 minutes.

Stir together wasabi powder and water in a small bowl.

Broil fish, skin sides down, on oiled rack of a broiler pan 5 to 7 inches from heat until fish is just cooked through, about 6 minutes.

Serve salmon drizzled with sauces.

Cooks' note:

• Soy-honey and wasabi sauces can be made 2 hours ahead and kept, covered, at room temperature.

Makes 4 servings.

Gourmet
May 2001

Epicurious.com © CondéNet, Inc. All rights reserved.


We ended up using only 2 salmon filets, so it served 2 instead of 4, but everything else was the same.

For the mushrooms, I bought 6 shitake mushrooms and cut them into 1/4" slices. I heated up some vegetable oil in a sautee pan and let the mushrooms brown. Sauteeing the mushrooms at high heat lets them caramelize a little bit, adding some flavors. If they went in at lower heat, they would have steamed more than sauteed, and they would have been less flavorful.

Enjoy everyone, and leave me a comment if you end up making this.

Friday, March 24, 2006

Fresh Mozzarella, Zucchini and Garlic Pizza

Today I bring a before and after sequence. We will demonstrate today the magical qualities of heat.


It has the ability to turn this flacid concoction
Before
into this beautiful pizza.
After

Here's how the magic happened:

The day before the magic happened, Antonia had made a batch of dough - a dough different than our usual pizza dough in that it had a little bit of sugar and less kneading time. Both of these made for the most delicious pizza dough I have had in... a week. The Trader Joe's dough is really good, too (but not as good as Toni's, of course).

On top of a batch of this dough, stretch ed out to fill our pizza pan (it's not a stone, but it works), went grated fresh mozarella, grated zucchini, and some finely chopped garlic. On top of that went a little bit of local olive oil.

Into a 425°F oven for 15 minutes.

[Note: The aforementioned 15 minutes is where teh magic happens.]

It was so good that anyone who would like to try it and shows up to my house will get a slice, even if I have to go out and buy the ingredients to make it.

Saturday, March 18, 2006

Maitake Ravioli with Truffle Oil

What is better than a going to the farmer's market, then coming home and cooking something with the spoils of the day? Nothing, that's what.

This morning, Antonia and I and the puppy went to the Farmer's Market. While walking past the stalls, I came across a fungal find that I could not pass up. Ever. Maitake mushrooms. How often do we see these in California? Almost never, I'd imagine. It turns out that the Solano Mushroom Growers (I think that is what the sign said) have started to grow maitake mushrooms. At $5 for 1/4 lb, they are not cheap, but also not an everyday find. I bought a quarter pound and started to think up what I could make with them.

When I got home, I remembered that there was a block of frozen pasta dough sitting in the freezer left over from when me made pasta 2 weekends ago. Perfect. Maitake Ravioli.

Maitake Ravioli with White Truffle Oil

1/4 lb maitake mushrooms, chopped into small pieces
2 tbs minced shallot
2 tsp minced garlic
2 tbs olive oil
2/3 cup grated parmesan cheese (Parmigiano Reggiano if you are lucky and rich)
1 recipe pasta dough (see here)
white truffle oil
parsely, chopped for garnish

In a sautee pan, heat up the olive oil. When it is hot, add the shallots and sautee for ~30 seconds. Add the mushrooms and sautee for 2 minutes. Then add the garlic and sautee for one more minute. Move the mushroom mixture to a bowl and stir in the cheese.

Roll down the pasta dough to the 1 setting on a pasta machine. Mound 1 tablespoon of filling onto the center of the dough. Only use 1 half of the dough. Once there are enough mounds of filling to cover 1/2 of the strip of dough, fold over the other half and press the ravioli. Make sure when pressing the ravioli that you get out all of the air. When folding over the dough, wet your fingers and lightly wet one side of the dough (the side with the filling) where the dough halves are going to touch to get a good seal. Cut the ravioli apart and press the edges with a fork lightly.

Bring a large pot of water to a gentle boil. A rolling boil may be to vigorous for the delicate ravioli. Let them boil for 4 minutes. Take them out with a slotted spoon and let them drain.

Dribble a little bit of white truffle oil over the ravioli and garnish with fresh chopped parsley.

Mmmmmmmmmmm..... I can still taste truffle oil in my mouth. It is an expensive ingredient, but brings so much flavor to a dish.

Enjoy!

Monday, March 06, 2006

Spaghetti al Pesto con Gamberoni, or Celebratory Dinner

Sunday night was a night to celebrate! I found out that I was accepted to the Viticulture and Enology Program at UC Davis. I will soon be a winemaker! To celebrate, I put together a dinner based around my all-time favorite sauce - pesto.

Spaghetti al Pesto con Gamberoni
Spaghetti with Pesto and Shrimp

1/2 box spaghetti
1 bunch basil, leaves only
1/4 c pine nuts
3 cloves garliic, chopped
1/4 c grated parmesan cheese
olive oil, at least 1/2 cup
salt
pepper
red pepper flakes
8 16/20 shrimp

To make pesto:
In a food processor, Add the basil, pine nuts and garlic. Turn on the processor and drizzle in the oil until a paste of the desired consistency is met. Add in the cheese. If the consistency becomes too thick, add in some oil, or even a little bit of water (shhh).

To make the pasta:
Add pasta to boiling water. Cook until al dente or however you like your pasta.

To make shrimp:
Clean and devein the shrimp. Spinkle each with salt, pepper, and red pepper flakes. Heat a skillet to medium high heat with a little bit of olive oil. When the pan is hot, add in the shrimp. Cook on the first side for 4-5 minutes and the second side for 3-4 minutes. On the second side, just cook until the shrimp are totally opaque.

Toss the pasta with the pesto and add the shrimp. Sprinkle with some parmesan and enjoy.

Next time you have pesto, think of me as a winemaker!