Virginia has been good to me so far. I've got my family here, I've got a great job, I've got friends. I continue to meet new people. Virginia has also provided me with great food.
Tonight for dinner I made a tomato omelet with eggs from Kirsty and Brian's chickens (brown this time, blue last time), a tomato from their garden, and some feta I had in the fridge. After a few long days and late nights an omelet has the perfect balance of tastiness and ease which leads to a high flavor return on effort.
Tomato Omelet
Olive oil
Salt
2 eggs
1 small tomato
feta cheese
Pour a little oil in the pan and heat up over medium heat.
Crack some eggs into a bowl/measuring cup, and beat up.
Pour the eggs into the hot pan, let them cook until just set at the bottom. Do you feel compelled to mix them a little? Go ahead and do it.
Slice up a tomato, put it on top of the omelet. Sprinkle with a little salt and then some feta.
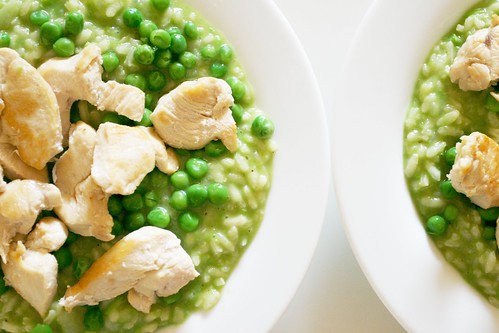
Since moving to our new house in Charlottesville, VA I have cooked three things almost exclusively - a meat sauce, bread, and pea risotto.
This pea risotto is delicious - in the photo here I added some browned chicken, but that isn't necessary for the dish. The fresh, sweet taste of the peas is a nice balance for the richness of the cheese/broth.
Pea Risotto
Adapted from Real Simple Recipes
1 tbsp butter 1 tbsp olive oil 1/2 onion, chopped 1 clove garlic, chopped 2 c arborio rice 1 c dry white wine (Try the Blenheim Vineyards Chardonnay, perhaps?) 4 c chicken broth 1 c grated Parmesan cheese 2 1/2 c frozen peas, thawed and divided 1 tsp salt, 1/4 tsp pepper
Pre-rice Heat the butter and oil over medium heat. Sautee the onion and garlic for 3-4 minutes, until soft. Put the stock in a separate pot and bring to a boil. Once at a boil, turn down a little to keep it hot.
Rice addition Add in the rice and stir to coat. Keep stirring the rice in with the butter/oil/onion/garlic for a few minutes, until the rice becomes fragrant or some rice browning occurs. Try not to burn the onions (it happens sometimes)
Wine and stock Add in the cup of wine and stir to absorb. It will absorb/boil off fast since the rice and pot are very hot at this point. Turn the pan down to medium-low. Add a ladleful at a time to the rice and stir. Once the rice has absorbed the stock, add another ladleful. This should take about 25 minutes. If you run out of stock before the rice seems fully cooked, add some water to the pot that the stock was heating in and heat up the water and finish the rice with water.
Cheese and peas When the rice is done (the rice grains will be tender but not mushy), add the cheese, salt and pepper. Turn off the heat. In a blender/food processor, puree 2 cups of the peas. If you need some liquid to get the peas to blend, add a little water. Add the pea puree to the rice. Stir in the remaining 1/2 cup of peas.
The dish was delicious. We even made it for a dinner party at some friends' house.
There is a myth that risotto is a difficult-to-produce, time consuming, restaurant-only dish to be attempted only by the most expert home cook. Nothing could be further from the truth. In my opinion it is more difficult to produce good long-grain rice than it is to produce a risotto. Let me tell you why: for long grain rice produced by western methods (Persians make their rice in a much smarter yet more time consuming manner) one must pre-measure the rice and water, bring to a boil, then simmer and hope that the water:rice ratio and heat rate were exactly right for the presented atmospheric conditions to get a rice with full cooked but individual grains that are not mushy.
On the other hand, risotto does not rely on hope at all. In making a risotto, the cook gets to monitor the rice and make any necessary adjustments. QED.
There are a few extra steps to making risotto - heating the stock, frying the rice, and the step that scares most away: stirring. Yet none of these aspects are insurmountable. Even someone with a 6 week old infant in the house can easily make a risotto.
Shrimp Risotto
1/2 lb 41/50 shrimp, with shells 1 shallot, finely chopped a couple cloves of garlic, finely chopped some spring onions (thank you RMI Good Life Garden, finely chopped 1 cup arborio rice 1/2 cup white wine (I used 2009 Dancing Bull Sauvignon blanc, California) shrimp stock (see below)
for the shrimp stock 1 carrot 1/2 onion, quartered shells from shrimp water salt
for the shrimp 1/2 tbsp butter 1/2 tbsp olive oil parsley, finely chopped
To make the stock Peel the shrimp and place the shells into a medium saucepan. Set aside the shrimp for later. Roughly chop the carrot and add to the pot. Cut the half onion into a few pieces and add to the pot. Fill the pot with water and set to a boil. As the stock boils it will extract shrimp flavor from the shells. The carrots will give it a slight orange color. Adjust salt to taste. Turn down to low and leave at a simmer.
To start the rice In a heavy pot add some olive oil and heat over medium. Once the oil starts to shimmer, add in the onions, shallot, and garlic. After a minute or two add in the rice. The rice will start to fry and sizzle. Let that go for a few minutes, stirring occasionally. Once the rice starts to take on a little bit of color add in the wine. The pan is very hot at this point and most of the wine will flash away, boiling very quickly. When the wine is almost gone ladle in some of the shrimp stock, being careful to avoid bringing along any of the solids (People seem not to like shrimp feet in their risotto). Ladle in enough stock to keep the rice barely covered. Turn the pan down to low and let simmer away. Stir occasionally. When the liquid level drops (it is being absorbed as well as evaporated away) add some more stock with the ladle. This will go on for ~30 minutes. If you run out of stock, just finish with water and adjust the salt later.
To cook the shrimp Melt the butter with the olive oil in a skillet over medium low. When the butter is melted add in the shrimp. Let them braise in the butter/oil mixture until you can see them turn opaque through the tops. Keep covered. Once opaque, flip the shrimp and add the parsley. Recover. The shrimp turn out very tender when cooked this way.
To assemble When the rice is finished and the shrimp are finished, pour all of the cooking liquid from the shrimp into the rice and mix in. This will add additional shrimp flavor and some richness to the risotto. Since it is a shellfish risotto, I don't like to add cheese. The butter/oil will help to bind the risotto and firm up the starchy matrix. Mix in some more chopped parsley if you have any left over. Add salt to taste and allow to cool slightly.
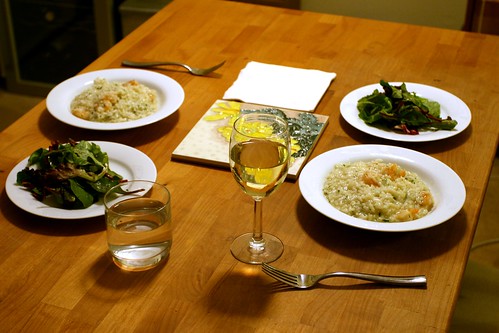
I ate my risotto with some of the Sauvignon blanc that I used to make it. It was perfect for the occasion - It wasn't a spectacular Sauvignon blanc (none of the Sancerre crisp, mineral deliciousness or the California oaky richness) but it was perfect as a beverage to go with dinner.
Antonia enjoyed it (the main goal, of course) and we ate it with a little mixed green salad.
I decided to stay home sick today after I was unable to convince my boss that I was healthy yesterday.
Lunchtime rolled around and it was time to go to the fridge. I spotted some baby carrots. My mind and flavor memory were thinking of the Farmers' Market carrots I had last week while looking at the baby carrots in the fridge. I was setting myself up for disappointment. Luckily, despite how bland many foods, like baby carrots, can be a quick roast in the oven can bring out whatever sweetness is locked inside the empty shell of a vegetable.
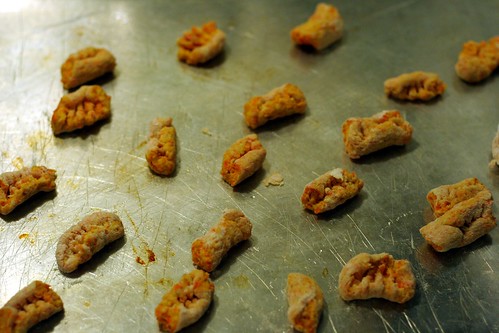
Carrot Gnocchi
enough for one person for lunch.
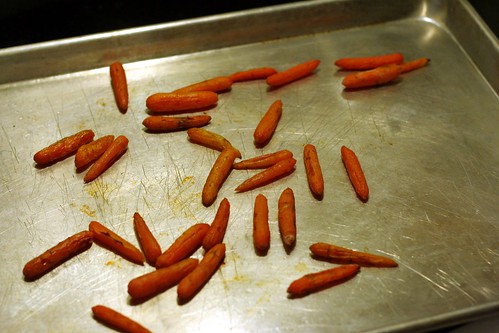
2 handfuls of baby carrots (from the photo it looks like about 25) flour butter Parmesan cheese salt and pepper
Put the carrots on a baking sheet and roast at 400 ºF for about 30 minutes until they are soft and sweet. (soft and sweet)
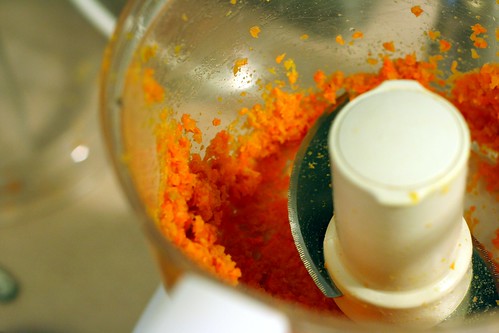
Puree the carrots in a food processor or in a mortar and pestle until you get something that loooks like carrot paste. (not so paste-y - a mortar and pestle would have been better)
Add salt and pepper to the paste, then start working in the flour to make a dough. It's hard to say when it is done. I try to make something firm enough that I can roll out into a log without it sticking to the board but not so firm that if you push your finger into the log it bounces back more than just a little. Once you have a log, cut the log into little pieces and roll against the back of a fork to put in the sauce-holding indentations.
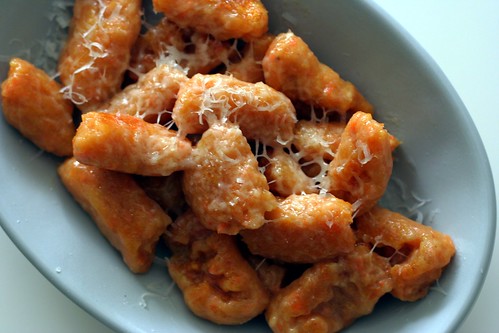
Bring a pot of water to a boil. At the same time melt a little bit of butter in the pan, let it foam up and then let the foam subside to start browning the milk solids. Browned butter = delicious.
After the gnocchi float to the top, drain them out and toss into the hot, sizzling butter. Give them a little bit of a fry to get a little bit of crust on the outside, then put them onto a plate and grate/shave a little bit of the parmesan cheese on top. Eat!
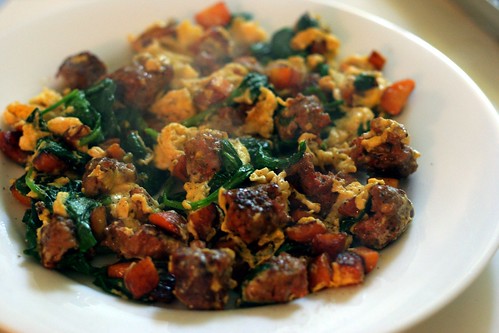
2 carrots, chopped into small cubes 2 eggs, beaten 1 hot italian sausage, skin removed a handful of baby spinach
Heat up a non-stick pan to medium and add a drizzle of olive oil. Put the carrots into the pan and let them cook. When the carrots start to brown, give the pan a shake and stir around the carrots. Eventually the carrots will be nice and brown and soft. At this point smush them all to one side and break up the sausage into the pan in chunks. Brown the sausage on all sides and allow to cook through. When the sausage is cooked, mix the carrots an sausage back together and toss in the spinach. Mix it up and let the spinach soften and wilt.
Once the spinach is done, pour in the beaten eggs, mix up, let the eggs cook to the desired firmness level.
Second article under my "Food" category in Google Reader led me to this article this morning (sfgate.com). My main take away from the article is that anyone with a well-stocked pantry can keep themselves fed and that it takes less time to make food from scratch than to go to the market to pick up a missing ingredient. While not universally applicable, it is certainly true for pasta.
I made meatballs over the weekend and the leftovers were sitting in our refrigerator, waiting to be eaten. I decided to see if the pasta claim from the article holds water.
At 11:00 I started mixing the flour and egg. At 11:30 I'm writing this post - photos uploaded to Flickr, meal already eaten. 30 minutes, start to finish. Granted, I already had the sauce made, but any prepared sauce would put one in the same position.
Pasta Fresca with leftover meatballs
serves one
2/3 cup all purpose flour 1 large egg, beaten with just a splash of olive oil Enough sauce/meatballs for one person (4 meatballs and 2 tbsp of the tomato sauce)
for the pasta Place the flour in a mixing bowl. Make a little hole in the middle of the flour. Pour the egg mixture into the hole. Using a fork, start to mix the flour into the egg, trying to keep the eggy dough mass together. Eventually the dough will be dry enough to turn out onto the counter to finish.
Keep kneading flour into the dough until it is quite stiff. During the kneading the gluten network forms and becomes quite tight. The dough will soften considerably with just 5-10 minutes of resting. Since I didn't give the dough the usual 30 minutes f rest in the fridge, I tried to do as much kneading as possible on the front end.
After the pasta sits for a few minutes, cut it ball in half and roll out each half with a rolling pin. Get it as thin as possible and try to make it into a long, skinny rectangle. The longer the rectangle, the longer the pieces of pasta. On the other hand, the skinnier the rectangle, the fewer strands. Pick something that makes you happy. After both halves have been rolled out, carefully roll the dough sheets into cigars. Using a sharp knife, cut into strips ~ 3/4 cm wide, and then unroll. The pasta is done! Get some water boiling.
for the sauce I had to pre-reheat the meatballs in the microwave for a few minutes. The tomato sauce went into a saucepan to reheat. As soon as it started to simmer, I added a little bit of water to thin out the sauce, as it had become quite thick in the refrigerator. Keep at a simmer until the pasta is done.
to cook the pasta When the water comes to a boil, add some salt and throw in the pasta. It should only take 2-3 minutes to cook. When it is pretty much done, throw the pasta into the sauce and let it absorb some of the sauce into the pasta. If necessary, thin out with some more water. The starch in the pasta plus the oil in the sauce makes a pretty good emulsion, so as long as it isn't soupy a little bit of water should extend the sauce without detriment.
On my way back from the vineyards yesterday where I was working with Tim on his research project I noticed that the Meat Lab board was out. For those not familiar with the meat lab, it is a small processing facility run by the Animal Sciences program. The facility is federally inspected by the USDA and sells meat from chickens, pigs, cows, and lambs, as well as some prepared food products like sausages and cheese. It is one of my favorite things about UC Davis and it is only open two days a week.
Browsing the two refrigerated cases and doing my best not to step on the small children as they shop from the bottom shelf, baskets in hand, I spotted my catch - a pork tenderloin and some ground lamb. The lamb will go into something Moroccan or Persian next week. The tenderloin was destined for dinner.
The next big question was how to prepare the meat. After very little consideration, I decided to stuff it with stuff I had at home - dried cranberries, parsley, caramelized onion, and breadcrumbs. With a bit of additional consideration I decided to go get some cashews to add some crunch and while shopping for cashews I saw white mushrooms were on sale, so I picked up a few of those, too.
To stuff the tenderloin, I had to open up the meat for stuffing. I open up the loin using what the lady in the video below calls "Roll Cutting." (It's a pretty good video)
And now, after being dazzled with pork cutting techniques, is the recipe:
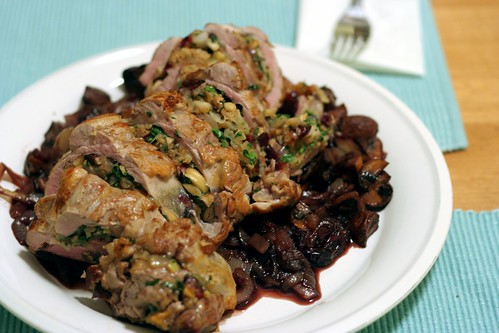
Stuffed Pork Tenderloin over Mushrooms
Feeds two with leftovers
2 onions, halved and cut into 1/4" half moons 1/2 lb white onions, quartered 1 pork tenderlion, about 1 lb. 1/2 cup dried cranberries 1 slice of bread 1/4 cup cashews a handful of parsley some red wine (I used the delicious 2008 Blenheim Vineyards Petit Verdot).
Heat oven to 375ºF. In a small bowl, add a little bit of the cranberries (about 1/4 of them) to some red wine and let them rehydrate.
Roasting the mushrooms Quarter the mushrooms and place them on a baking sheet or in a roasting pan. Add enough olive oil just to coat the mushrooms and toss them around to distribute the oil. Add some salt. Roast for about 30 minutes, while onions are cooking. Throw the slice of bread on the pan to dry out a bit.
For the caramelized onions Preheat a large skillet to medium-high heat. When the oil is hot, add the onions. Stir around for a few minutes until they start to take on a bit of color. Add a tablespoon of brown (or white) sugar. I know. It's cheating. I also didn't want to spend an hour on the onions. Stir in the sugar and lower the heat a bit, to medium-medium-high. Keep some water on hand. When the onions dry out and start to crackle, instead of sizzle, add some water. In about 20 minutes the onions should be nicely brown.
Prepare the pork tenderloin Open up the pork loin using the roll cutting method from the video. Pat dry on both sides and give it a little bit of salt.
To assemble the filling Chop the cashews into smaller pieces. If the cashews are salted, you shouldn't need to add any more salt to the filling. Chop up the caramelized onions. They are pretty gooey at this point so they should just fall apart. Add to the cashews. Chop the parsley and add to the filling mixture. Chop the cranberries and add to the filling. Do the same with the bread.
To fill, and roll Spread the filling over the unrolled tenderloin. Press the filling into the meat so it sticks when you are rolling it up. Roll up the tenderloin. I start from the back to the front, but it doesn't matter. I was out of butcher's twine, so I had to seal mine closed with toothpicks. If you have twine, truss it up, like in the video or however you feel comfortable. It doesn't have to be pretty.
Sear roll, then put into the oven At this point, you can probably take out the mushrooms. They should be shriveled and have some roasted flavor. Lower the oven to 350ºF. Heat some olive oil in an oven-safe pan. I use cast iron for this because cast iron pans are perfect for this - they hold heat well and transfer from stovetop to the oven. When the oil is just about smoking, turn on the kitchen fan and put in the stuffed tenderloin. Allow it to brown on the first side, approximately 4 minutes. Rotate the loin and repeat so the whole thing gets brown.
Once the tenderloin is all browned up, put the mushrooms into the pan around the loin and put it into the oven. I also threw in whatever leftover caramelized onions I had that didn't make it into the filling. Roast until the internal temperature gets to your pork-comfort-doneness level. Mine is 140ºF.
Finish the sauce, eat When the roasting is done, take the pan out of the oven and put it back on the stove. Remove the tenderloin from the pan and put it on a cutting board and cover tightly with some foil. This will allow the juices to get back into the meat and will keep it from getting cold.
Turn the burner back on to medium-high. When the juices in the pan start to sizzle, add the reserved cranberries and the wine that they were soaking in. Reduce the wine until the sauce takes on some body. The pork juices as well as any onion that breaks down in the pan should help to thicken it. Remove your trussing material (twine or toothpicks) and slice.